
Why Sew-Ins Remain Popular
Sew-in installations have remained a favorite protective style for decades because they offer security and longevity that other methods cannot match. The hair bundles are sewn directly onto cornrowed natural hair, creating a bond that withstands daily activities, exercise, and sleeping without shifting or slipping.
The protective nature of sew-ins allows natural hair to rest from daily manipulation, heat styling, and environmental stressors. This break promotes hair growth and health, making sew-ins both a beauty choice and a hair care strategy.
Sew-ins typically last six to eight weeks, making them cost-effective over time. The extended wear period means you invest time in installation once and enjoy the results for weeks. This longevity appeals to busy individuals who want beautiful hair without daily styling commitments.
The versatility of sew-ins accommodates various lifestyles. From athletes who need secure hair during intense workouts to professionals seeking polished, low-maintenance styles, sew-ins adapt to different needs while maintaining a natural appearance.
Selecting Bundles for Sew-In Installation
Bundle quality directly affects how your sew-in looks and lasts. Virgin human hair bundles provide the best results because the hair has never been chemically processed. The intact cuticles prevent tangling and extend the lifespan of your installation.
Remy hair bundles, where cuticles are aligned in the same direction, offer excellent quality at a moderate price point. This hair type tangles less than non-Remy options and maintains a healthy appearance throughout the wear period.
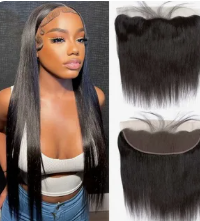
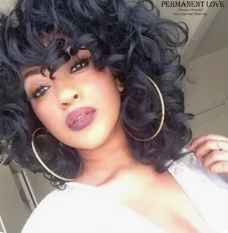
Texture selection should complement your natural hair or desired aesthetic. Straight bundles create sleek, sophisticated styles. Body wave and loose wave textures add movement and volume while remaining manageable. Curly textures provide maximum volume and make bold statements.
Length and density choices depend on your desired look. Longer lengths require more bundles to maintain fullness at the ends. Higher densities create voluminous styles while lighter densities appear more natural for everyday wear.
Hair origin matters in bundle selection. Brazilian, Peruvian, Malaysian, and Indian hair each have distinct characteristics. Brazilian hair is thick and versatile, Peruvian hair is lightweight yet full, Malaysian hair is silky and straight, while Indian hair matches many natural textures well.
Determining Bundle Quantity
The number of bundles needed depends on several factors. Hair length is a primary consideration. Lengths up to 16 inches typically require two to three bundles. Lengths from 18 to 22 inches need three bundles for standard fullness or four for extra volume. Lengths over 24 inches usually require four bundles to maintain density at the ends.
Installation type affects bundle quantity. Full sew-ins covering your entire head require more hair than partial sew-ins with leave-out sections. If you plan to leave out your edges or a middle part, you need fewer bundles than for complete coverage.
Desired fullness influences how many bundles to purchase. Natural, everyday looks work well with fewer bundles, while glamorous, voluminous styles require additional hair. Consider your lifestyle and typical aesthetic when deciding.
Head size matters, though most calculations assume average head circumference. Those with larger heads may need an extra bundle to ensure adequate coverage.
Quality retailers like RJ Hair Creations typically provide bundle recommendations based on desired length and fullness, helping customers purchase the appropriate amount without waste or shortage.
Preparing for Installation
Natural hair preparation is essential for a successful sew-in. Wash and deep condition your hair thoroughly before installation. Clean, moisturized hair creates a healthy foundation and ensures your natural hair remains in good condition under the sew-in.
Trim split ends before installation. Damaged ends will continue to split during the weeks your hair is braided, potentially causing more damage. Starting with trimmed, healthy hair promotes growth during the protective styling period.
Consider a protein treatment if your natural hair is weak or damaged. Strengthening your hair before braiding helps it withstand the tension of cornrows and the weight of bundles.
The braiding pattern affects how well your sew-in lays and how comfortable it feels. Communicate with your stylist about the desired parting pattern. Straight-back cornrows work for most styles, while beehive or circular patterns accommodate specific parting preferences.
Braid tension should be firm but not painful. Overly tight braids cause headaches, bumps, and possible hair loss. Your braids should feel secure without causing discomfort or pulling at your scalp.
Installation Techniques
Track placement determines how natural your sew-in appears. Starting at the nape and working upward creates a solid foundation. Each track should be sewn securely to the cornrows using a curved needle and strong thread.
Thread color should match your natural hair color for leave-out styles or the bundle color for full sew-ins. Matching thread becomes invisible within the installation, while contrasting thread may show through.
Weft folding techniques create flatter, more natural-looking tracks. Rather than overlapping wefts, fold them strategically to build volume without creating bulky layers. This skill separates professional installations from amateur attempts.
Leave-out styling integrates your natural hair with the bundles. The amount of hair left out depends on your natural hair texture and density. More leave-out creates a more authentic appearance but requires styling to match the bundle texture.
Closure or frontal pieces eliminate the need for leave-out at the crown or hairline. These pieces create a natural-looking scalp and allow for various parting options. Installing a closure or frontal requires additional skill but provides superior results.
Maintenance During Wear
Washing your sew-in every one to two weeks maintains cleanliness and freshness. Dilute sulfate-free shampoo with water and apply it to your scalp using a nozzle bottle. Massage your scalp gently, then rinse thoroughly, allowing the suds to cleanse the length of the bundles.
Conditioning focuses on the bundle lengths and ends. Apply conditioner, avoiding the braided base to prevent slippage. Allow the conditioner to penetrate for several minutes before rinsing completely.
Drying sew-ins properly prevents mildew and odor. Sit under a hooded dryer or use a blow dryer on low heat to dry your braids and scalp completely. Damp braids can develop unpleasant odors and potentially lead to scalp issues.
Moisturizing your scalp throughout the wear period prevents dryness and itching. Use a nozzle bottle to apply light oils or scalp treatments directly to your scalp between the tracks. Avoid heavy products that cause buildup.
Nighttime protection prevents tangling and maintains your style. Wrap your hair in a silk or satin scarf or sleep on a silk pillowcase. This reduces friction that can cause matting and frizz.
Styling Options
Sew-ins accommodate numerous styling possibilities. Wear the hair straight by flat ironing for a sleek, sophisticated look. Always use heat protectant to preserve bundle quality and prevent heat damage.
Create curls or waves using curling irons, flexi-rods, or braiding techniques. The hair accepts styling just like natural hair, allowing you to change your look throughout the wear period.
Updos and ponytails are possible with sew-ins. High ponytails work best with 360 frontals or lace frontals that cover the entire hairline. Half-up styles and low ponytails work with most sew-in configurations.
Coloring sew-in bundles allows for customization. Virgin hair accepts dye well, though professional coloring is recommended to achieve even, beautiful results without damage.
Common Mistakes to Avoid
Installing bundles on damaged or unhealthy natural hair compounds existing problems. Always address hair health concerns before getting a sew-in. Use the style as a protective measure, not a cover-up for neglect.
Keeping sew-ins in too long causes matting, tangling, and possible damage to natural hair. Eight weeks is the maximum recommended wear time. Beyond this, the risk of damage increases significantly.
Neglecting scalp care leads to buildup, itching, and possible infections. Maintain a consistent cleansing and moisturizing routine throughout the wear period.
Using poor-quality bundles wastes money on installation. Cheap hair tangles, sheds, and loses its appearance quickly, requiring premature removal and reinstallation. Investing in quality bundles from reputable sources like RJ Hair Creations ensures your installation looks good for the entire wear period.
Excessive tension during installation causes traction alopecia. If your braids hurt or you notice bumps along your hairline, the tension is too tight. Speak up during installation to prevent long-term damage.
Bundle Care During Wear
Detangle bundles daily to prevent matting. Use a wide-tooth comb or paddle brush, starting at the ends and working upward. Gentle, consistent detangling is easier than trying to remove severe matting.
Limit heat styling to preserve bundle quality. While human hair bundles can withstand heat, frequent high-temperature styling degrades the hair over time. Use the lowest effective temperature and always apply heat protectant.
Protect your sew-in during swimming. Chlorine and salt water damage hair bundles and cause tangling. If you must swim, wear a swim cap or thoroughly wet and condition your hair before entering the water to minimize absorption of damaging chemicals.
Avoid sleeping with wet or damp sew-ins. Moisture promotes bacterial growth and creates unpleasant odors. Always ensure your hair is completely dry before bed.
Removal Process
Professional removal is recommended to prevent damage to your natural hair. Stylists have the proper tools and experience to remove tracks without causing breakage or matting.
If removing the sew-in yourself, use seam rippers or small scissors designed for this purpose. Cut only the thread, being extremely careful not to cut your natural hair or the wefts if you plan to reuse the bundles.
Take down tracks slowly and methodically. Rushing through removal causes unnecessary breakage and tangles. Set aside adequate time for gentle, careful removal.
Detangle your natural hair thoroughly after removing braids. Use a detangling spray and work in sections, being patient with any knots that formed during the wear period.
Post-Removal Care
Give your hair a break between installations. Allow at least one to two weeks for your hair and scalp to recover. This break prevents long-term damage from constant tension and allows you to assess your hair's health.
Deep condition thoroughly after removal. Your hair needs intensive moisture and protein treatment after being braided for weeks. Use a quality hair mask and consider a professional deep conditioning treatment.
Trim any split ends or damaged sections before reinstalling. Regular trims maintain hair health and prevent damage from traveling up the hair shaft.
Assess your scalp health before reinstalling. Address any irritation, dryness, or thinning areas. Your scalp should be healthy before adding the tension of a new sew-in.
Reusing Quality Bundles
High-quality bundles can be reused for multiple installations. After removal, wash the bundles thoroughly with clarifying shampoo to remove all product buildup and oils.
Deep condition reused bundles to restore moisture and softness. The hair has been exposed to styling products, heat, and environmental factors, so intensive treatment helps revitalize it.
Store cleaned bundles properly between uses. Keep them in breathable bags or hanging in a cool, dry place. Proper storage maintains bundle quality and extends their usable life.
Inspect bundles before reinstallation. Check for excessive shedding, damage, or tangling. High-quality bundles should remain in good condition for two to three installations when properly cared for.
Choosing a Qualified Stylist
Experience with sew-ins is essential. Ask the stylists about their sew-in experience and request to see photos of previous work. Quality installations require specific skills that not all stylists possess.
Communication about your desired look ensures satisfactory results. Bring reference photos and discuss bundle quantity, texture, and length before installation begins.
A qualified stylist considers hair health throughout the process. They should assess your natural hair condition, use appropriate tension during braiding, and provide aftercare instructions.
Portfolio review reveals styling capability. Look for installations with flat tracks, natural-looking leave-out or closures, and overall polished appearances.
Sew-in installations using quality hair bundles provide a protective styling solution that looks natural and lasts for weeks. With proper bundle selection, professional installation, and consistent maintenance, sew-ins deliver beautiful results while promoting natural hair health.


Write a comment ...